Tuesday, May 31, 2011

NYC - Food Edition

I’m back!! Back from the magical land of pizza and cupcakes – because that’s pretty much all I ate in New York City. I wouldn’t even know where to begin describing my adventure – nor would words do it any justice – so for now, please enjoy a small sampling of some of the delicious things I consumed while in the Big Apple. I’ll have a more extensive entry up later this week, with reviews of all the shows I saw…because next to eating, all I wanted to do was cram in as many Broadway shows as I could.


New York pizza is unlike any pizza I’ve ever had in my life. It’s huge, the crust is super thin and they have the craziest and biggest selections of flavors. I loved it so much. I ate pizza almost every day…sometimes twice a day.


Of course I had to have a New York hot dog…this one was from the take-out window of The Boathouse in Central Park. I wanted to eat in the actual restaurant, but we just didn’t have enough time…the hot dog, however, was pretty standard, but it was somehow more magical considering I was eating in Central Park.


NYC is pretty much the land of cupcakes. Every corner has a bakery and generally, that bakery has cupcakes.


Of course, I HAD to go to Magnolia Bakery – I’d only been fantasizing about it since I first fell in love with cupcakes. However, the cupcakes unfortunately really weren’t much to write home about…they were good, but there was nothing really distinct about them. I had the vanilla and red velvet, and while the red velvet was pretty good, the vanilla was very disappointing. It was too sweet (which is rare for me) and not very vanilla-y (if that makes any sense).


I accidently stumbled upon Crumbs bakery a few days after I went to Magnolia and I have to admit that their vanilla cupcake was superior to Magnolia’s, in both size and taste. However, it did taste a bit like a boxed cake mix…but at least a good one!


One of the places that was a must-see for me was the Chelsea Market. I went a little crazy buying all these unique spices and salts…but what really made an impression on me was the actual grocery market they had there. The herbs were INSANE! Look at that rosemary! Everything was so big and fresh, I wish I could do my grocery shopping there all the time…


I had the best veggie burger of my life in NYC. Hands down. There really is nothing more to say.


One of the places we were recommended to go by our frequent NYC-travelling Italian friends was Tony Di Napoli’s. And it was amazing. All the portions were family-sized so they fed 2-3 people and you therefore had to share (why aren’t more restaurants like this?) and the food was just beyond delicious. I wanted to take a bath in the chicken marsala sauce. That’s how good it was.


We went out one night to a restaurant called Swing 46, which was on this street of restaurants all with prix-fixe menus. I had the tomato and mozzarella salad, roast chicken entrĂ©e and chocolate brownie for dessert and although all 3 sound pretty basic…they were all incredible. Especially that brownie. It literally melted in my mouth and was by far the best brownie I’d ever had in my life.


Went to a crepe joint one night after the theatre and they had the cutest names for all their crepes. I had the “Joie de Vivre” – a PB&J crepe. Needless to say, it was excellent.


Obligatory New York cosmo – and it was fabulous!
Saturday, May 14, 2011

Blog Hiatus - Goodbye Edmonton, Hello NYC!

Hey dudes, just letting you know that I'm going on a temporary blog hiatus. I'm heading to New York City tomorrow for an entire week and I'm planning to be too busy with shopping, shows and food to blog. However, I will be back next weekend with a post dedicated to everything I've devoured in the Big Apple - so stay tuned!

P.S. If anyone has any suggestions on places to go - let me know!! I have some stuff planned out but I've never been there before so if you have and know of someplace great, send it my way :)


Photo Curtesy of Eleni's New York

Wednesday, May 11, 2011

Peanut Butter Butterscotch Marshmallow Squares

So, when my dear friend Tim very kindly offered to de-virus my computer, I asked what kind of compensation he would like – hopefully in the form of a baked good. He specifically requested “those peanut butter marshmallow squares” and I immediately began my research to find a good recipe, as I had never made them before.

Turns out, there are about a bagillion recipes for these squares on the internet and they’re almost all exactly the same. So it was pretty easy.

Oh, and the recipe is ridiculously easy too. No wonder these are so popular – with only 4 ingredients and no baking required, they’re pretty much the easiest dessert in the world to make.

And I’ve now rekindled a love for butterscotch that I didn’t even know I had.

No-Bake Peanut Butter Butterscotch Marshmallow Squares

Ingredients:

1/2 cup butter
1 cup peanut butter
1 bag (300 g) of butterscotch chips
1 bag (250-300 g) of mini rainbow marshmallows*

*Don’t use white marshmallows. Apparently the rainbow fruity marshmallows make a difference (as opposed to regular white marshmallows). Don’t ask me why.

Directions:

Melt together the butter, peanut butter, and butterscotch chips on low heat until it’s all melted and mixed, stirring constantly. Let the mixture cool for a little while so the marshmallows don’t melt.


Stir in mini marshmallows. Pour mixture into a greased 11"x13" pan.

Refrigerate for a few hours. Cut into small squares and serve.

Monday, May 2, 2011

"And perhaps a sticky bun...or 4..."

Once again, I went on a bit of a blog hiatus. I blame my show. It was a blast, but it left me with very little time to blog. I did bake a lot though. Mainly props for my show…and I figured I might as well share some of them with you, in case you ever have to play a hungry little girl in a Sondheim musical one day.

One of the specific sweets I needed to eat in the show was a “sticky bun”. Well, actually 4 of them…every night…however, they couldn’t actually be all that sticky as I had to be able to swallow them and sing and not get it all over my costume. So, I altered these buns to make them not so sticky…however, I made these twice last week and the second time I doubled the batch so I could have some for my cast and I sticky-ed them up with some cream cheese icing goodness. And they were divine.

I know there are a lot of cinnamon bun recipes floating around out there, and I’ve tried a handful…but these are my new favorite. They bake up beautifully and taste divine. So go make some sticky buns! And eat at least 4…

Cinnamon Buns
(Recipe adapted from Allrecipes Ooey-Gooey Cinnamon Buns)
I find that these are better if you roll the dough thinner and maybe up the filling a bit…this recipe is a great starter, but you can definitely improvise with these in terms of what you want to put in them.

Ingredients:

Dough
1 tsp white sugar
1 (.25 ounce) package active dry yeast
1/2 cup warm water (110 degrees F/45 degrees C)
1/2 cup milk
1/4 cup white sugar
1/4 cup butter
1 tsp salt
2 eggs, beaten
4 cups all-purpose flour

Filling
3/4 cup brown sugar
1 tbsp ground cinnamon
1/4 cup melted butter

Directions:

In a small bowl, dissolve the sugar and yeast in the warm water. Let stand until creamy, about 10 minutes. Warm the milk in a small saucepan until it bubbles, then remove from heat. Mix in 1/4 cup sugar, 1/4 cup butter and salt; stir until melted. Let cool until lukewarm.

In a large bowl, combine the yeast mixture, milk mixture, eggs and 1 1/2 cup flour; stir well to combine. Stir in the remaining flour, 1/2 cup at a time, beating well after each addition. When the dough has pulled together, turn it out onto a lightly floured surface and knead until smooth and elastic, about 8 minutes.

Lightly oil a large bowl, place the dough in the bowl and turn to coat with oil. Cover with a damp cloth and let rise in a warm place until doubled in volume, about 1 hour.


Once risen, turn dough out onto a lightly floured surface, roll into an 18x14 inch rectangle (the thinner you can roll the dough though, the better - these dimensions are simply a guideline). Brush with 2 tablespoons melted butter, leaving 1/2 inch border uncovered; mix brown sugar and cinnamon and sprinkle mixture over the buttered dough.


Starting at long side, tightly roll up, pinching seam to seal. Brush with remaining 2 tablespoons butter. With serrated knife, cut into 15 (or more) pieces; place cut side down, into a buttered pan (I like to use circular foil pans that look like Chinese food take-out pans…they work pretty perfect for these). Cover and let rise for 1 hour or until doubled in volume. Meanwhile, preheat oven to 375 degrees F.


Bake in preheated oven for 25 to 30 minutes, until golden brown. Let cool in pan for 3 minutes, then invert onto serving platter.

Finally, frost these babies up with some cream cheese icing and you’re good to go!

Saturday, April 23, 2011

Quick and Easy Quiche

When I think of quiche, I would hardly think to describe it as “quick and easy”. Mainly because the only times that I’ve ever made quiche, it’s taken me most of the day. I make the crust from scratch and use a million ingredients that need to be prepared different ways and end up with a final product somewhere around the mid-afternoon and a sink full of more dirty dishes than should be necessary.

Hence why I don’t make quiche very often.

However, today Matt and I had the day off so in addition to sleeping in and lazing around the house all day, I wanted to make something nice for breakfast. Pancakes were out of the question (for obvious reasons) and I didn’t have bread to make French toast. I wanted something a little fancier than plain old scrambled/fried/poached eggs and when I absent-mindedly suggested quiche, Matt got very excited. Not wanting to disappoint him, I quickly searched for a “quick and easy quiche recipe”.

Apparently, they aren’t as rare as I thought…

I had lots of broccoli and a fair variety of different cheeses in my fridge so I figured broccoli cheese was the way to go.

As for the crust…I rarely buy frozen pie crust and my usual pie crust is a bit of a lengthy process so I found a quick 4-ingredient quiche crust, however I wasn’t entirely satisfied with how it turned out. The flavor and texture of it was fine however it stuck pretty badly to the bottom of the pie plate so it’s probably best to just use your favorite pie crust recipe or a frozen crust instead.

But enough yacking, on to the recipe!

Broccoli and Cheese Quiche
(Recipe adapted from Cajun Chef Ryan’s recipe)
I still can’t get over how well this quiche turned out. It’s amazingly delicious and now one of my new staples. Plus, Matt almost ate the entire thing himself…and he’s a tough critic.

Ingredients:

1 9-inch pie shell
6 large eggs, cracked (I only had 5 eggs and it still turned out fine)
1 cup milk
1 cup shredded sharp cheddar cheese (or any combination of cheeses you want)
2 cups broccoli florets, steamed and cooled
salt, pepper, onion powder and garlic powder, to taste

Directions:

Preheat oven to 350° F. Using a fork, prick the shell dough a few times to prevent air bubbles from forming. Brown the pie shell in the oven for about 10 minutes.

While the pie shell crust is browning, beat the eggs then add the milk and about half of the cheese in a medium bowl.


Fold in the broccoli florets and then add the spices to the egg mixture.

When the pie shell has browned, removed from the oven. Pour the egg, cheese and broccoli filling into the browned pie shell and then sprinkle the remaining cheese on top.


Return the filled pie shell to the oven. Bake for 35 to 45 minutes or until the quiche is puffed up and set. (You may want to put it on a cookies sheet as it apparently prevents burning. I didn’t however, and it was fine.)


Remove from the oven and allow to rest for 5 minutes, then slice into portions.

Thursday, April 21, 2011

Theatre!

So, I have a recipe post all ready to go but my image editor is being weird and I can’t edit the pictures right now…so I figured I would instead do a post about theatre – the other love of my life (besides baking…and Matt).

For any of my readers who live in Edmonton and don’t have me on Facebook, I have a show opening next week! I’m playing Little Red Riding Hood in Into the Woods by Stephen Sondheim, playing April 27-30 at the Timms Centre (corner of 87 Ave and 112 Street on the U of A campus). Tickets and more info are available through Tix on the Square.

My brother is also in a show opening tonight and running through to April 30th as well. It’s called BoyGroove (the revival of the original Chris Craddock show) and it’s playing at the Catalyst Theatre (8529 Gateway Blvd.). Tickets are also available through Tix on the Square.

We both did a little press this week for the shows, so here is my interview with Global TV this morning.


And Eric and the boys are on the cover of See magazine!

So, if you’re hanging around Edmonton and looking for some good theatre to see, you should check out Into the Woods and BoyGroove!!

Friday, April 15, 2011

The BEST Chocolate Chip Cookies

These are the best chocolate chip cookies I’ve ever made. I’ve been searching for YEARS for a recipe like this. YEARS, I tell you. They are perfect in every way. Flat and crispy on the outside and buttery and chewy on the inside.

However, I know everyone’s different…and some people like big, fluffy cookies. But not me. To me, these are perfection.

Matt even likes these cookies. So much, that when I told him yesterday that I was thinking of making them again, he came home from work all excited, only to give me the biggest, saddest face when he realized that I hadn’t gotten around to making them yet.

And he doesn’t even like dessert!

I made them today though…and he’s proceeded to eat close to half the batch. Yeah. They’re that good.

So, if you’re going to make anything on this blog, make these cookies. They are perfect. There is really nothing more to say.

Chocolate Chip Cookies
(Recipe from Iowa Girl Eats)

Ingredients:

1 cup butter, softened
1 cup sugar
1 cup brown sugar
2 eggs
2 tsp vanilla
2 cups flour
1½ tsp salt
1 teaspoon baking soda
1 bag semisweet chocolate chips

Directions:

Preheat oven to 375 degrees F.

Cream butter and sugars until it’s the texture of cornmeal. Add eggs and vanilla and then mix until combined.


In a separate bowl, combine the flour, salt and baking soda. Add the dry ingredients into the wet ingredients in three batches. Add chocolate chips last and mix briefly.

Bake for 8-10 minutes or until golden brown.

Tuesday, April 12, 2011

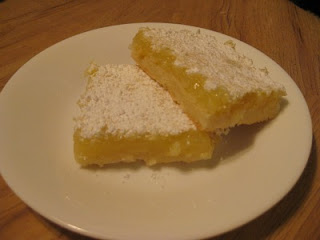
Lemon Bars

I’ve had a mad craving for lemon bars lately…I can’t explain it. I’ve never been a hardcore fan but for some reason they’ve been all that I can think about lately.

What can I say? My life is pretty exciting…

Anyways, late last night, after I got home from rehearsal, I decided to end the cravings once and for all. I made my very first batch of lemon bars. I then proceeded to eat half of them with a glass of wine in front of a girly movie. I now believe that every Monday night should include lemon bars, wine and girly movies.

Mondays are for indulging. Just embrace it.

Lemon Bars
(Adapted from Chasing Tomatoes’ recipe)

Ingredients:

Crust
1/2 cup unsalted butter, softened
1/4 cup icing sugar
1 tsp grated lemon zest
1 cup flour
pinch of salt

Filling
2 eggs
1 cup sugar
2 tbsp flour
4 tbsp freshly squeezed lemon juice
1 tsp grated lemon zest

Directions:

Pre-heat oven to 350 F and line a 9x9 inch square pan with parchment paper. *Note: Make sure you line both the bottom AND the sides with parchment. I made the mistake of doing just the bottom and they stuck to the sides pretty badly.

For the crust:

In a bowl, beat the butter and sugar together until fluffy. In a separate bowl, whisk the flour, salt, and lemon zest together. Add to the butter mixture and combine. The result will look like shortbread dough. Press the dough evenly into the bottom of your parchment paper lined pan.


Bake for 15-20 minutes, until the edges are browned. Remove from the oven and set on a cooling rack.

For the filling:

In another bowl, combine the eggs, sugar, flour, lemon juice and lemon zest. Mix well. Pour over the crust and return it to the oven for about 20 minutes, until the top is dry and the edges are just starting to brown. Remove from the oven and let cool.


When completely cooled, dust the squares with icing sugar, and slice. They keep best in a sealed airtight container in the fridge.

Saturday, April 9, 2011

Whole Wheat Yogurt Pancakes

I love pancakes. Unfortunately, Matt does not. This is a constant struggle in our relationship.

However…I guess if that’s the biggest issue we have, we’re not doing too bad.

This is my absolute favorite pancake recipe right now. I’ve made these pancakes at least 3 times in this past week alone…I’m kind of in love with them.

They are just fluffy enough, just sweet enough and partially whole wheat (so kind of healthy…?). You should go make some.

Whole Wheat Yogurt Pancakes
(Adapted from Can You Stay For Dinner’s recipe for Whole Wheat Sour Cream Pancakes)
I didn’t have any sour cream so I used plain, full-fat yogurt in these instead…and they were just as divine.

Ingredients:

1/2 cup whole wheat flour
1/2 cup all purpose flour
2 tsp baking powder
2 tsp brown sugar
1/2 tsp salt
3/4 cup milk (I used vanilla soymilk)
1 egg
3 tablespoons plain yogurt

Directions:

In a large bowl, whisk the flours, baking powder, sugar, and salt.

In a measuring cup or small bowl, whisk the egg into the milk. Pour the wet mixture into the dry ingredients and stir just until combined. Add the yogurt and give the batter one final stir.

Spoon a quarter cup of batter onto a griddle or skillet set over medium heat that has been coated with nonstick cooking spray (or butter…I used butter…I like butter). Flip after 3-4 minutes, just as you notice bubbles forming around the edges of each pancake, and cook a few minutes more.

Serve with a pat of butter and lots of maple syrup.

Tuesday, April 5, 2011

Snickerdoodle Cupcakes

Wow, it’s been awhile…sorry, blog. I have been baking a lot as well as taking pictures and all that jazz – I just haven’t been able to get anything online. Plus my computer got a nasty virus so I was without it for a little bit.

But moving on, I have a nice cupcake recipe for you today! Courtesy of Ms. Martha Stewart, who had the brilliant idea of turning my favorite cookies into cupcakes. Genius, I tell you.

I made these for a party I went to a couple weeks ago, so they’re a little overdue…but delicious none the less. They may actually be my new favorite cupcake recipe. They’re pretty perfect, even without icing.

*Note: And next time, I might use cream cheese icing…cinnamon buttercream is nice, but it’s almost overkill on these.

Snickerdoodle Cupcakes
(Taken from my Martha Stewart Cupcakes cookbook)

Ingredients:

1½ cups all-purpose flour
1½ cups cake flour
1 tbsp baking powder
1/2 tsp salt
1 tbsp ground cinnamon
1 cup unsalted butter, room temperature
1¾ cups sugar
4 large eggs
2 tsp vanilla
1¼ cups milk

Directions:

Preheat oven to 350 degrees F. Line standard muffin tins with paper liners. Sift together both flours, baking powder, salt, and cinnamon.

With an electric mixer on medium-high speed, cream butter and sugar until pale and fluffy. Add eggs, one at a time, beating until each is incorporated, scraping down sides of bowl as needed. Beat in vanilla. Reduce speed to low. Add flour mixture in three batches, alternating with two additions of milk, and beating until combined after each.


Divide batter evenly among lined cups, filling each three-quarters full. Bake, rotating tins halfway through, until a cake tester inserted in centers comes out clean, about 20 minutes. Transfer tins to wire racks to cool completely before removing cupcakes.


I iced these with a cinnamon buttercream, which is basically just regular vanilla buttercream with a tsp or 2 of cinnamon added into the mix. However, like I said, cream cheese icing might balance the flavors better.

Wednesday, March 30, 2011

My boyfriend isn't picky.

Conversation with my boyfriend yesterday evening:

Matt-“Hey Weez!”

Me-“Yes?”

Matt-“I love ya.”

Me-“I love you too.”

Matt-“I’d even love you if you fed me human meat.”

Me-“…”

Matt-“I might even love you more!”

Apparently, there are now no limitations when it comes to my cooking.

*Note: Don’t even ask where the nickname “Weez” came from…it’s a long – and not very politically correct – story.
**Note: We’re not future cannibals. We just really like It’s Always Sunny in Philadelphia.


He's a special one.

Monday, March 28, 2011

Slow Cooker Spaghetti Sauce

So, I got a slow cooker for Christmas…and one of my resolutions was to use it a lot and post the recipes. On the plus side, I have been using it a ton however I’ve just been too lazy or unorganized to ever blog about it. Mainly, I’ve just made a lot of chili and a bunch of roasts…

However, I do have a recipe for you today! Finally! I had been craving spaghetti and meatballs for most of last week and so when the weekend finally rolled around, I decided to make a nice hearty meal for Matt and I. I decided to make the meat sauce in my slow cooker and it turned out really well. Plus my house just smelled incredible all day.

I also threw in some meatballs that I already had in my freezer, made this garlic bread to accompany the meal and these chocolate chip cookies for dessert…it was a serious comfort food party.

P.S. I NEED to do a post on those chocolate chip cookies. They are quite possibly the best chocolate chip cookies I’ve ever had. EVER.

Slow Cooker Meat Sauce

Ingredients:

2 lb lean ground beef
1 large onion, chopped
6 cloves garlic, finely chopped
1 can (28 oz) diced or whole tomatoes*, undrained
1 bottle (24 oz) strained tomatoes
1 can (6 oz) tomato paste
dried thyme
dried oregano leaves
salt
pepper
crushed red pepper flakes
olive oil

*I only used whole tomatoes because I originally thought it was a can of diced…it didn’t make too much of a difference though, I just had to break them up a bit but diced would’ve probably been better.

Directions:

In a large skillet, cook onions in a drizzle of olive oil on medium heat. When onions are just starting to get soft, add garlic and cook for another minute or two. Add beef and cook until it is no longer pink; drain.


Spoon beef mixture into your slow cooker. Stir in remaining ingredients. (*Note: I rarely measure spices so unfortunately I didn’t really have an idea of how much I put in…plus, I just ended up adding more to taste later anyways.)

Cover; cook on high heat for 4-6 hours or low heat for 8-9 hours.


Spoon over your favorite pasta and enjoy!