Wednesday, March 16, 2011

Yogurt Honey Scones

I had a major scone fail yesterday…I was sitting at home, wanting to bake something, and I came across Joy the Baker’s recipe for Grapefruit, Honey, and Yogurt Scones. I had just bought some grapefruits and had half a container of Greek yogurt in my fridge so I figured it was fate and I went about making the scones.

First off, I didn’t have any parchment paper so I greased some aluminum foil. Needless to say, the scones burnt…bad. Even though I turned down my oven. However, my oven is super old and likes to burn things sometimes…so I blamed it on that as well as my lack of parchment and substitution stupidity.

I was, however, able to taste the salvageable parts of the scones but unfortunately, I didn’t really like them…the grapefruit was nice, but the grapefruit sugar (made with the zest) had a frustrating bitterness to it that threw everything off for me. I think it’s cus I live in a polar climate where fresh grapefruit is rarer than green grass before March…and Joy probably had much better grapefruits, considering she lives in California.

Note to self: Move to California.

Anyways, today I wanted to take another stab at these scones, omitting the grapefruit this time around. The result? DELISH! They are light and flakey, almost like biscuits, and just scream for warm butter and fresh jam. I might be in love.

Mind you, I still had to turn my oven down a bit to avoid burning…

Note to self: Get new oven.

But the parchment really makes a difference. So definitely invest in some if you want to make these scones.

Yogurt & Honey Scones
(Adapted from Joy the Baker’s recipe for Grapefruit, Honey, and Yogurt Scones)

Ingredients:

1½ cups all-purpose flour
1 tsp baking powder
1/2 tsp baking soda
1/4 tsp salt
6 Tbsp unsalted butter, cold
2 Tbsp honey
1/2 cup plain Greek yogurt

Directions:

Place a rack in the center of the oven and preheat to 425 degrees F. Line a baking sheet with parchment paper (IMPORTANT!) and set aside.

In a medium bowl, whisk together flour, baking powder and baking soda.


Dice cold butter into small chunks and add to the dry ingredients. Using your fingers (or a pastry blender), and working quickly, break the butter down into the flour mixture until butter chunks are the size of oat flakes or small peas. The butter and flour combined will resemble coarse meal. Add the honey and yogurt. Toss together with a fork until all of the dry ingredients are moistened by the honey and yogurt.


Turn the scone dough out onto a lightly floured surface. Form into an 8 inch circle, about 1 inch thick. Use a knife or a bench scraper to cut the dough into six scone triangles. Place on the prepared baking sheet.


Bake for 15 to 17 minutes, until golden brown on top and firm but soft in the center. Allow to cool on the pan for 10 minutes before serving. Serve warm with butter and jam.

Garlic Dill Cheese Biscuits

I’m a firm believer in the theory that dill makes everything better. Now, I may have made that theory up…but I still stand behind it.

And the combo of dill, garlic and cheese? THE BEST.

The other night, we had leftover chili for dinner. However, I decided to spice it up a bit with homemade biscuits. I had bought a huge bunch of dill, so I chopped some up and added it, along with some garlic, to my favorite biscuit recipe.

And it was good…Matt and I polished off nearly the entire batch between the 2 of us. There’s your warning.

Garlic Dill Cheese Biscuits

Ingredients:

2 cups all-purpose flour
2 teaspoons baking powder
1/2 teaspoon baking soda
1/2 teaspoon salt
1/2 tablespoon sugar
2 tsp garlic powder
1/2 cup cold butter
1 cup plus one tablespoon buttermilk
1 cup grated sharp cheddar cheese
1/2 cup grated parmesan cheese
2 tbsp fresh chopped dill

Directions:

Preheat the oven to 425 degrees. Oil a baking sheet. (This is important, as these suckers like to stick.)

Mix together the flour, baking powder, baking soda, salt, sugar & garlic powder. Slice the cold butter into the flour mixture. Use a pastry blender (or two kitchen knives, or your hands) to cut the butter into the flour mixture until you have a coarse, grainy mixture

Stir in grated cheese and dill. Make a well in the middle of the dry mixture and pour the buttermilk into it. Stir just until moistened. The dough should be of a consistency like drop cookie dough or just a bit stiffer. If it is not moist enough, add another tablespoon of buttermilk.

Spoon the dough into rounded mounds on the baking sheet, leaving room for expansion.

Bake for 12 to 14 minutes or until the biscuits just begin to brown. I actually ended up turning my oven down to in between 400 and 425 as my first batch nearly burned at 425, so watch them carefully. Remove the biscuits from the baking sheet and place them on a wire rack to cool.

Monday, March 14, 2011

Mojito Cupcakes

With all the warm(er) weather that we’ve suddenly been blessed with, I’ve found myself fantasizing about summer lately…sangria, gardening, barbeques – I even went out and bought some flowery short-sleeved dresses today.

What else reminds me of summer? Mojitos. Mind you, I am guilty of drinking them year-round…but they’re just so much better on a hot summer day.

I’ve wanted to make mojito cupcakes for awhile now. I’ve seen recipes floating around the internet and with a friend’s housewarming party over the weekend, I thought it was a perfect time to try them out and use my friends as my favorite food-loving guinea pigs.

These cupcakes are unique and delicious. Plus they have booze in them. So I suggest you go make some the next time you are, like me, having pre-summer mojito cravings.

Mojito Cupcakes
(Adapted from Alpine Berry’s recipe)

Ingredients:

1½ cups all-purpose flour
1¼ tsp baking powder
1/4 tsp baking soda
1/4 tsp salt
1/2 cup mint leaves, loosely packed
3/4 cup whole milk, hot
1/2 cup unsalted butter, softened
1 cup granulated sugar
2 eggs
grated zest of 2 limes + the juice
1/2 tsp vanilla extract
2 tsp white rum

Directions:

Preheat to 350F.

Add mint leaves to the hot milk, and let steep for 10-15 minutes. When steeped, pour milk through a fine-mesh sieve into a small bowl and press liquid from mint leaves. Discard leaves and allow milk to cool slightly.


Sift flour, baking powder, baking soda and salt. Set aside.

In a large bowl, beat butter on medium speed until creamy, about 30 seconds. Add sugar and continue beating until light and fluffy, 3-5 minutes. Scrape the sides of the bowl occasionally.

Add eggs, one at a time, beating well after each addition. Mix in lime zest, juice, vanilla and rum.

On very low speed, add flour mixture in 3 additions, alternating with milk and ending with flour, mixing until just incorporated.


Fill paper-lined muffin cups half full. Bake until cupcakes spring back when touched, 18-22 minutes. Allow to cool in pan for 5 minutes. Remove cupcakes from pan and cool completely.


I iced these with a mojito buttercream recipe I found here, though I ended up adapting it so much to my tastes that it really didn’t resemble that recipe at all by the end and I don’t really have a set recipe for it. However, I basically just added more mint and lime until it finally tasted like a mojito to me – so use that recipe as a guideline.

Saturday, March 12, 2011

Baked French Toast

So my new “eat healthier” resolution from yesterday? Went right out the window this morning. I was browsing The Pioneer Woman’s blog (one of my absolute favs) and I stumbled across her Cinnamon Baked French Toast recipe…and the pictures alone were pure food porn and I knew my life would not be complete unless I made that delicious delicacy as fast as possible. So I did.

Omg. Quite possibly one of the BEST things I have ever made. And it was so simple. Bread, milk, eggs and cinnamon streusel baked in the oven? Why have I not thought of this already!

It basically combines everything I love. It’s like if French toast and coffee cake had a baby…it would be this. And I would gladly baby-sit whenever they wanted.

…not really sure if that metaphor worked.

Regardless, this is amazingly delicious. Please make it. Just go. Do it. You won’t be disappointed.

Cinnamon Baked French Toast
(Adapted from The Pioneer Woman’s recipe)
I had to make a few alterations due to the fact that I had no cream…I figured that made it healthier. I also used a whole wheat baguette...however, let’s face it. This really isn’t that good for you.

Ingredients:

French Toast
1 baguette
4 eggs
1 cup milk
1/4 cup sugar
1 tbsp vanilla

Topping
1/2 cup flour
1/2 cup brown sugar
1 tsp cinnamon
1/4 tsp salt
1/2 cup cold butter, cut into pieces

*Matt thought that there was too much streusel topping on this…but I disagree. So if you’re a fan of streusel, use it all, however if you’re not – you might want to half it.

Directions:

Grease a baking pan with butter (I used a pie plate as I broke my shallow casserole dish while pulling it out of the cupboard…). Tear bread into chunks (or cut into cubes) and evenly distribute in the pan.


Mix together eggs, milk, sugar, and vanilla. Pour evenly over bread. Cover tightly and store in the fridge several hours or overnight (I omitted this step and it still turned out fine).

In a separate bowl, mix flour, brown sugar, cinnamon, and salt. Add butter pieces and but into the dry mixture until mixture resembles fine pebbles.


When you’re ready to bake the casserole, preheat oven to 350 degrees. Remove casserole from oven and sprinkle crumb mixture over the top. Bake for 45 minutes for a softer, more bread pudding texture. Bake 1 hour or more for a firmer, less liquid texture.


Scoop out individual portions. Top with butter and drizzle with maple syrup.

Friday, March 11, 2011

Peasant Soup

I returned to boot camp this morning, after a month-long hiatus that involved a lot less working out than I was used to, and a lot more consumption of bad food. Consequently, I felt really inspired afterwards to start eating a little bit healthier again. I hadn’t bought a significant amount of fresh produce in awhile so I decided to hit H&W, stock up on veggies and make a hearty vegetable soup today.

This is, without question, one of my favorite soup recipes. I don’t even know how many times I’ve made it. I got it from my Canadian Living Vegetarian cookbook (which might just be my favorite cookbook…I’ve made almost everything in it) and the picture alone is what sold me on the soup. It was just so colorful and it looked so delicious so I knew I had to try it. Soon enough, it became a staple in my house.

It’s called Peasant Soup, but it really is very similar to minestrone. It’s hearty, delicious and 100% vegan. Enjoy!

Peasant Soup
(Adapted from the Canadian Living Vegetarian Cookbook)

Ingredients:

2 tbsp vegetable oil
3 stalks celery, diced
3 carrots, diced
1/2 an onion, diced
4 cloves garlic, minced
1/2 tsp salt
2 tbsp fresh dill, chopped
1/4 tsp turmeric
1 can (28 oz) diced tomatoes
1/2 cup dried green lentils, rinsed and drained
1/2 cup fusilli pasta
1 can (19 oz) red kidney beans, drained and rinsed
2 tbsp chopped fresh parsley
vegetable broth (optional)

Directions:

In large saucepan or Dutch oven, heat oil over medium heat; fry celery, carrots, onion, garlic, salt, dill and turmeric, stirring occasionally, until softened (about 6 minutes).

Stir in tomatoes, lentils, and 4½ cups water (I usually use half water/half vegetable broth). Bring to boil; reduce heat and simmer, covered, until lentils are tender, about 25 minutes.

Meanwhile, in large pot of boiling salted water, cook pasta until al dente (according to directions on box).

Drain pasta and add to soup along with beans and parsley; simmer for 5 minutes (Only do this is you plan on eating all the soup that day, otherwise the pasta soaks up all the liquid when you refrigerate the leftovers. I generally just make the pasta separate and add it as I want it.)


You can also add more salt and/or pepper to suit your tastes.

Thursday, March 10, 2011

Homemade Applesauce

Now, I know this recipe isn’t very exciting…or pretty…or covered in sprinkles or filled with butter like the majority of the things I like to make. However, it is sweet. And delicious. So it still counts.

(And in all honesty, I actually just wanted to make this to use as an ingredient in some muffins I plan on making tomorrow…)

Applesauce. I’ve been wanting to make my own applesauce for a long time now, and I came across some colossal granny smith apples on sale at the grocery store this week so I figured that it was finally time to give it a try.

I don’t generally crave applesauce…I’ve only ever had the kind you buy in those little plastic cups so my opinion of it wasn’t exactly great. But the theory behind it is lovely. And I knew that there had to be a way to make it better.

So I made some. From scratch. It was remarkably easy and the ingredients are really simple – you just throw everything into a pot, let it cook for half an hour, mash it up and presto, homemade applesauce! Plus, there’s the added bonus of it having no preservatives, fake sugars and misc chemicals jam-packed into it.

And thus, allow me to re-introduce you to applesauce. Real applesauce. You might just fall in love.

Applesauce
(Adapted from Simply Recipes’ Applesauce recipe)
This applesauce is amazing. There really is no other word to describe it. There’s a hint of cinnamon, just enough sweetness and a beautiful tartness from the lemon.

Ingredients:

3 to 4 lbs of peeled, cored, and quartered apples (I used 5 hefty granny smith apples)
4 strips of lemon peel - use a vegetable peeler to strip 4 lengths
Juice of one lemon, about 3-4 Tbsp
3 inches of a cinnamon stick
1/4 cup brown sugar
2 tbsp maple syrup
1 cup of water
1/2 teaspoon of salt

Directions:

Put all the ingredients into a large pot. Cover. Bring to boil, then lower the heat and simmer for 20-30 minutes. (Don’t worry if the water doesn’t completely cover the apples, everything will all break down together anyways.)


Remove from heat. Remove cinnamon sticks and lemon peels. Mash with a potato masher. You may also want to add some more sugar if it isn’t sweet enough for you.


Serve hot or cold. It freezes easily, and will last up to one year in the freezer.

Sunday, March 6, 2011

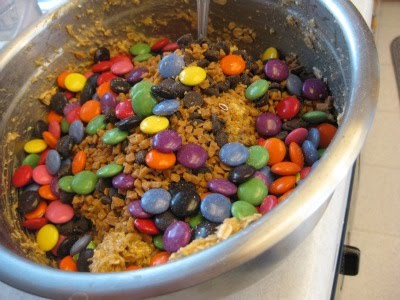
Monster Cookies

I got nostalgic this weekend. I wanted monster cookies. I don’t normally make them as I kind of think that once you pass the age of 12, you look kind of silly eating cookies with Smarties in them…

Who am I kidding? No one ever looks silly eating monster cookies.

Speaking of which, I’ve always wondered why they are even called “monster cookies”. If anything, they should be called, “recycle cookies” or “everything-I-have-in-my-baking-cupboard cookies”. Cus that’s basically all they are. Aside from the standard peanut butter, oatmeal and Smartie components, you can really throw any sort of mix-ins into these cookies. You can even mix up different types of peanut butter and oats. They are mish-mash cookies at their finest.

So go ahead, clean out your cupboards, make some cookies and feel like you’re 12 again! It really is the best – and not to mention, most delicious – way to recycle.

Monster Cookies
Usually, these cookies are made without flour. However, I was experimenting today with a mix of a few different recipes and found the dough wasn’t stable enough, so I added a bit of flour to stiffen it up. However, you could always up the oatmeal instead.

Ingredients:

1/2 cup butter, softened
1 cup brown sugar
3/4 cup white sugar
3 eggs
1 tsp vanilla extract
1 tsp maple syrup
1 cup peanut butter (I used 1/2 creamy, 1/2 crunchy)
1 tsp baking soda
1/4 tsp salt
3½ cups oatmeal (quick cooking or old fashioned)
1/2 cup flour
2 cups of add-ins (I used Smarties, chocolate chips and Skor bits)

Directions:

Preheat oven to 350 degrees F.

In a large mixing bowl, combine the butter with the brown and white sugars until blended. Add eggs, vanilla and syrup. Beat until combined.

Add peanut butter, baking soda and salt. Beat until combined.

Slowly add oatmeal and flour (if using). Blend and then fold in mix-ins.

Drop dough onto baking sheets and bake for 8-10 minutes until light brown and just set around edges. Cool on wire racks.