Showing posts with label oats. Show all posts

Sunday, March 6, 2011

Monster Cookies

I got nostalgic this weekend. I wanted monster cookies. I don’t normally make them as I kind of think that once you pass the age of 12, you look kind of silly eating cookies with Smarties in them…

Who am I kidding? No one ever looks silly eating monster cookies.

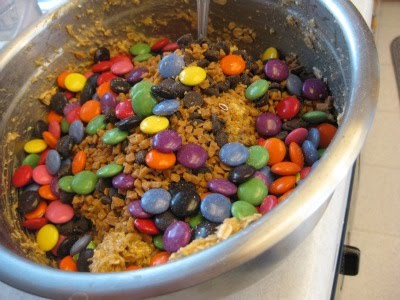
Speaking of which, I’ve always wondered why they are even called “monster cookies”. If anything, they should be called, “recycle cookies” or “everything-I-have-in-my-baking-cupboard cookies”. Cus that’s basically all they are. Aside from the standard peanut butter, oatmeal and Smartie components, you can really throw any sort of mix-ins into these cookies. You can even mix up different types of peanut butter and oats. They are mish-mash cookies at their finest.

So go ahead, clean out your cupboards, make some cookies and feel like you’re 12 again! It really is the best – and not to mention, most delicious – way to recycle.

Monster Cookies
Usually, these cookies are made without flour. However, I was experimenting today with a mix of a few different recipes and found the dough wasn’t stable enough, so I added a bit of flour to stiffen it up. However, you could always up the oatmeal instead.

Ingredients:
1/2 cup butter, softened
1 cup brown sugar
3/4 cup white sugar
3 eggs
1 tsp vanilla extract
1 tsp maple syrup
1 cup peanut butter (I used 1/2 creamy, 1/2 crunchy)
1 tsp baking soda
1/4 tsp salt
3½ cups oatmeal (quick cooking or old fashioned)
1/2 cup flour
2 cups of add-ins (I used Smarties, chocolate chips and Skor bits)

Directions:

Preheat oven to 350 degrees F.

In a large mixing bowl, combine the butter with the brown and white sugars until blended. Add eggs, vanilla and syrup. Beat until combined.

Add peanut butter, baking soda and salt. Beat until combined.

Slowly add oatmeal and flour (if using). Blend and then fold in mix-ins.

Drop dough onto baking sheets and bake for 8-10 minutes until light brown and just set around edges. Cool on wire racks.

Friday, February 4, 2011

Friday Night Cookies

Some people go out on Friday nights. Out with friends, out to dinner, out to the bar, out on a date…me, when I have a free Friday night, I usually bake. I might have a glass of wine…or two. I might also make a spontaneous trip to Homesense and buy ridiculously adorable teacups that I really don’t need. I might also put on yoga pants and a Team Jacob t-shirt and search online for the best oatmeal cookie recipe known to man…

I did all of these things tonight. And it was glorious.

Sometimes, I get a hankering for oatmeal cookies. Plain and simple. So tonight, I made some. I omitted the raisins though. I just wasn’t feelin’ them.

However, the cookies did turn out pretty awesome. I may have eaten about 6 or 7 right out of the oven…

Yeah. They’re that good.

So if you’re a nerd like me and not out being social and sexy on a Friday night, you should make these cookies. Just sayin’.

Oatmeal Cookies
(Adapted from The "BEST" Oatmeal Cookie recipe)

Ingredients:

3 eggs, beaten
1 teaspoon vanilla extract
1 cup butter, softened
1 cup brown sugar
1 cup white sugar
2½ cups all-purpose flour
1 teaspoon salt
1 teaspoon ground cinnamon
2 teaspoons baking soda
2 cups rolled oats
3/4 cup chopped pecans

Directions:

Preheat oven to 350 degrees

In a small bowl, combine the eggs and vanilla. In a medium bowl, cream together the butter, brown sugar, and white sugar. In a separate bowl, combine the flour, salt, cinnamon and baking soda.

Add the flour mixture to the creamed mixture and stir until all of the dry ingredients are absorbed. Next, stir in the egg and vanilla mixture, then stir in the rolled oats and pecans. Dough will be stiff – you can add a little bit of milk at this point if you like to moisten it a bit. Drop dough by teaspoonfuls onto an unprepared cookie sheet.


Bake for 10 to 12 minutes, until the edges are golden. Allow cookies to cool 5 minutes on the baking sheet before removing to a wire rack to cool completely.

Monday, November 22, 2010

Gluten-Free Apple Crumble Pie

I did a show a little while back called, Perfect Pie. In it, my character was known for making amazing pies and pastries. Because of this, I made it my own little personal mission to learn how to make great pies – especially pastry from scratch.

I’m very picky about pies. I love fruit pies but I hate it when they’re too sweet. I especially hate it when apple pies are too sweet. My mom makes an AMAZING apple crumble pie and I have always been a little nervous to try to make one myself in fear that it wouldn’t be anywhere near as good as hers.

Sarah and I were at the farmer’s market on Saturday and I noticed that one of the vendors (specializing in gluten-free items) had gluten-free pie dough. I decided to buy some along with some fresh granny smith apples and embark on a gluten-free apple crumble pie adventure! If it was bad, I could always cheat and blame the dough, right?


Thankfully, it wasn’t. It actually turned out really good. So good, in fact, that I wasn’t able to snap a picture of the final product before it was devoured by my family. So yeah. It was good.

I will also definitely do a post in the future about my own pie dough as I do have a killer (and very not-gluten-free) recipe, but for now, enjoy this wheat-free alternative :)

Gluten-Free Apple Crumble Pie
Pie is another thing I don’t tend to have a set recipe for…I’m always adding more of this or that to suit it to my tastes. This recipe is kind of just a guideline.

Ingredients:

1 gluten-free pie crust (bottom crust only)

Filling:
6-8 coarsely chopped & peeled granny smith apples
2 tbsp lemon juice
1/2 cup sugar
2 tbsp rice flour
1/4 tsp cinnamon

Topping:
3/4 cup oat flour
1/2 cup brown sugar
1/2 cup wheat-free rolled oats
2 tsp cinnamon
pinch salt
1/3 cup cold butter, cubed

Directions:

Topping: In a bowl, whisk together flour, sugar, oats and cinnamon. Using pastry blender (or your fingers), cut in butter until crumbly; set aside.

On a lightly floured surface, roll out pie dough to a generous 1/8-inch (3 mm) thickness; fit into 9-inch (23 cm) pie plate. Trim to leave 3/4-inch (2 cm) overhang; fold under and crimp edge. Set aside.

Filling: In large bowl, toss apples with lemon juice. Add sugar, flour and cinnamon; toss to combine. Scrape into pie shell. Sprinkle with topping.

Bake at 400°F oven for 10 minutes. Reduce heat to 350°F; bake for about 50 minutes or until filling is bubbly and thickened. Let cool on rack.

Friday, November 19, 2010

Sinful Gluten-Free Dark Chocolate Brownies

Sometimes, I get a little experimental in the kitchen. Sometimes, the results are delicious, whereas other times, it can get disastrous. However, that’s what experimenting is for, right? And what better way to do it than with food!

I have a friend staying with me this week. Her name is Sarah. She is gorgeous, crazy talented, continuously bouncy but unfortunately unable to digest gluten. Therefore, I’ve taken this as an opportunity to stretch my gluten-free baking muscles and start experimenting with different flours!

It’s almost pathetic how excited I get over this stuff…

Anyways, tonight I was craving chocolate. Good, dark, rich chocolate. So, I found a nice dark chocolate brownie recipe, threw some certified wheat-free oats into my Magic Bullet to make a fine oat flour and went a little crazy. And the results were…sinful.

(I also think it’s interesting that I’ve now made brownies for this blog more times in the past 2 weeks than I have in my entire life. Just sayin’.)

Gluten-Free Dark Chocolate Brownies
(Adapted from Joy the Baker’s Dark Chocolate Brownies)
I halved the original recipe and used a loaf pan just in case the brownies turned out awful, but since they didn’t, you should probably double it and use a full square cake pan.

Ingredients:

3/4 cup oat flour
1/2 teaspoon baking powder
1/4 teaspoon salt
6 tablespoons oil
6 ounces pure unsweetened chocolate, coarsely chopped
1 cup sugar
2 eggs
1 teaspoon vanilla

Directions:

Preheat oven to 350 degrees. Line a loaf pan with parchment paper.

Whisk together flour, baking powder and salt and set aside.

Place oil and chopped chocolate in a medium sized heat proof bowl. Melt chocolate either in the microwave (keep a good eye on it!!) or in a double boiler (Place the bowl over a pot of barely simmering water, being sure that the bottom of the bowl does not touch the boiling water. Stir until chocolate and oil are completely melted & mixed. Use pot holders to remove the bowl from over the boiling water). Let mixture sit for a few minutes.

In a medium sized bowl, whisk together sugar, eggs and vanilla extract until pale and thick. Pour the chocolate mixture into the egg mixture. Whisk until completely incorporated. Add the flour mixture all at once and whisk to incorporate. Pour into the prepared pan and bake for 30-40 minutes, or until a skewer inserted in the center comes out clean.


These are super rich and super delicious. You might need some milk.

Thursday, November 18, 2010

Whole Wheat Oatmeal Quick Bread

I love homemade bread. Unfortunately, I kind of suck at making it. I’ve made both yeasted and quick breads and they always seem to have this uncanny habit of either not cooking all the way through (gummy on the inside, burnt on the outside) or just tasting like crap. Needless to say, I’ve been frustrated.

I even made bread yesterday and was going to blog about it…but it sucked. A lot.

However, today something magical happened. I toyed around with a new quick bread recipe and it actually turned out alright! Scratch that – BETTER than alright. It’s so yummy, in fact, that I’ve had to move it into the downstairs fridge to avoid from eating the whole thing.

I’m kind of in love with this recipe now. And this bread. Today, after countless homemade bread fails, I finally had a bread win!

Whole Wheat Oatmeal Quick Bread
(Adapted from Eating Well’s Honey Oat Quick Bread)
The buttermilk in this recipe gives it a really nice, almost biscuit-like quality. It’s brown and crumbly on the outsides, and soft and moist on the inside. However, make sure you cut big slices – it’s almost too crumbly for thin ones.

Ingredients:

1 cup quick-cooking (not instant) oats
1 1/3 cups whole-wheat bread flour
1 cup all-purpose flour
2 1/4 teaspoons baking powder
1/4 teaspoon baking soda
1 1/4 teaspoons salt
1 large egg, beaten
1 cup plain yogurt
1/4 cup canola oil
2 tablespoons brown sugar
3/4 cup buttermilk

additional flour
additional oats (optional)

Directions:

Preheat oven to 375°F. Coat a 9-by-5-inch loaf pan with cooking spray (or the oil of your choice). Sprinkle about a tablespoon of flour into the pan and tip the pan back and forth to coat the sides and bottom with it.

Thoroughly stir together oats, flours, baking powder, baking soda and salt in a large bowl.

Whisk the egg, yogurt, oil, sugar and buttermilk in a medium bowl until well blended.
Add the yogurt mixture into the flour mixture and stir until just combined (don’t over mix). Scrape the batter into the pan, spreading evenly to the edges. Sprinkle oats over the top.

Bake the loaf for about 40 to 50 minutes (until well browned on top and a toothpick inserted in the center comes out clean). Let stand in the pan on a wire rack for 15 minutes. Run a table knife around and under the loaf to loosen it and turn it out onto the rack. Let cool until barely warm, about 45 minutes.

*Note: Because there aren’t any preservatives and such in the bread, it will keep longer if you store it in the refrigerator.


ENJOY! It makes great toast…or you can just have it plain with butter. That’s what happened to most of mine.

Thursday, November 11, 2010

Vegan Baking Adventures with Jess

Vegan baking used to frighten me. I couldn’t imagine how any dessert could even come close to tasting good with the absence of butter. I love butter. I love it more than most things in life.


However, a very close friend of mine eats vegan. Her name is Jess. She is beautiful, talented, ridiculously energetic and a great vegan cook. But sadly, she does not have an oven in her house.

So, I kindly offered up my own kitchen today in exchange for a vegan baking lesson. And let’s just say that the results were surprisingly delicious.

There were some crazy shenanigans along the way…but that’s bound to happen when the two of us get together in the kitchen.

We made vegan brownies and (mostly) vegan pumpkin cookies.

And I gained an entirely new appreciation for coconut oil. I might start cheating on butter.

Vegan Tofu Brownies

Tofu is great because it absorbs flavours so well. It also gave the brownies a nice moist texture. P.S. You can make this recipe gluten-free by eliminating the carob chips.

Ingredients:

1 12 oz (300 g) package soft tofu
½ cup water
½ cup oil
2 tsp vanilla
½ cup cocoa powder
1 cup sugar
½ tsp salt
½ tsp baking soda
1 cup spelt flour
½ cup carob chips


Directions:

Preheat oven to 350°F. Grease an 8x8 inch square baking pan (once again, we had to use a circle pan…I really need to eat that casserole).

Blend tofu in a blender or food processor to smooth (I used my Magic Bullet). Whisk tofu in a large bowl with water, oil and vanilla.

Add cocoa, sugar, salt, baking soda and flour to the wet ingredients. Mix until smooth.

Pour into prepared pan. Sprinkle chips on top.


Bake for 45-50 minutes.

Cool, cut and serve.


Supposed-to-be-Vegan Pumpkin Cookies

We had big plans for these vegan pumpkin cookies until we realized we had no flax seeds (to act as an egg substitute). Therefore, we just used real eggs…so these cookies are dairy-free, but not animal-product-free.

Ingredients:

1 cup coconut oil, softened
1 cup pumpkin puree
1½ cups sugar
½ cup flax seed, blended (or 2 eggs)
1 tbsp vanilla
3 cups oat flour (we used 1 cup each of oat, spelt and whole wheat flours)
1 cup rolled oats
¾ tsp baking soda
¾ tsp salt
4 tsp cinnamon
1 tsp ground ginger
½ tsp nutmeg

Directions:

Preheat oven to 350°F.

Mix coconut oil, pumpkin puree, sugar, flax seed/eggs and vanilla in a large bowl.

Add flour, oats, baking soda, salt, cinnamon, ginger and nutmeg to the wet ingredients. Mix until smooth.

Drop dough by rounded spoonfuls onto an ungreased baking sheet. (We added the remaining carob chips to the cookies as well)

Bake for 12-15 minutes.

Let cookies cool for 5 minutes on the baking sheet, then transfer to a wire rack to cool completely.

Makes about 2 dozen large cookies.

*Note: These cookies are pretty fluffy…we’re going to work with the recipe some more to perhaps make muffins with it. They would be great muffins.

DELICIOUS!!